이 튜토리얼은 2018년에 새로운 강의로 재작성되었습니다 [새 튜토리얼 보기]
이번 강좌에서는 React.js 컴포넌트의 LifeCycle API 에 관하여 배워보겠습니다.
LifeCycle API는, 컴포넌트가 DOM 위에 생성되기 전 후 및 데이터가 변경되어
상태를 업데이트하기 전 후로 실행되는 메소드 들 입니다.이 메소드를 왜 쓰겠어.. 쓸일이 있겠어.. 라고 생각 하실 수 있는데,
가끔 이를 사용하지 않으면 해결 할 수 없는 난관에 가끔 부딪치기도 때문에
잘 알아뒀다가 필요 할 때 사용하는것이 좋습니다.강좌 6-2 편에서도 전화번호부를 구현 할 때, 인풋박스에 기본값을 전달 해 줄때와,
자원낭비를 줄이기 위하여 코드를 최적화 할 떄 LifeCycle API 가 사용되었답니다.
1. 시작하기
이번 강좌는 편의를 위해 jsfiddle 위에서 작업을 해보도록 하겠습니다.
F12키를 눌러 개발자 도구를 열은 후 아래 작업물의 버튼을 눌러보세요.
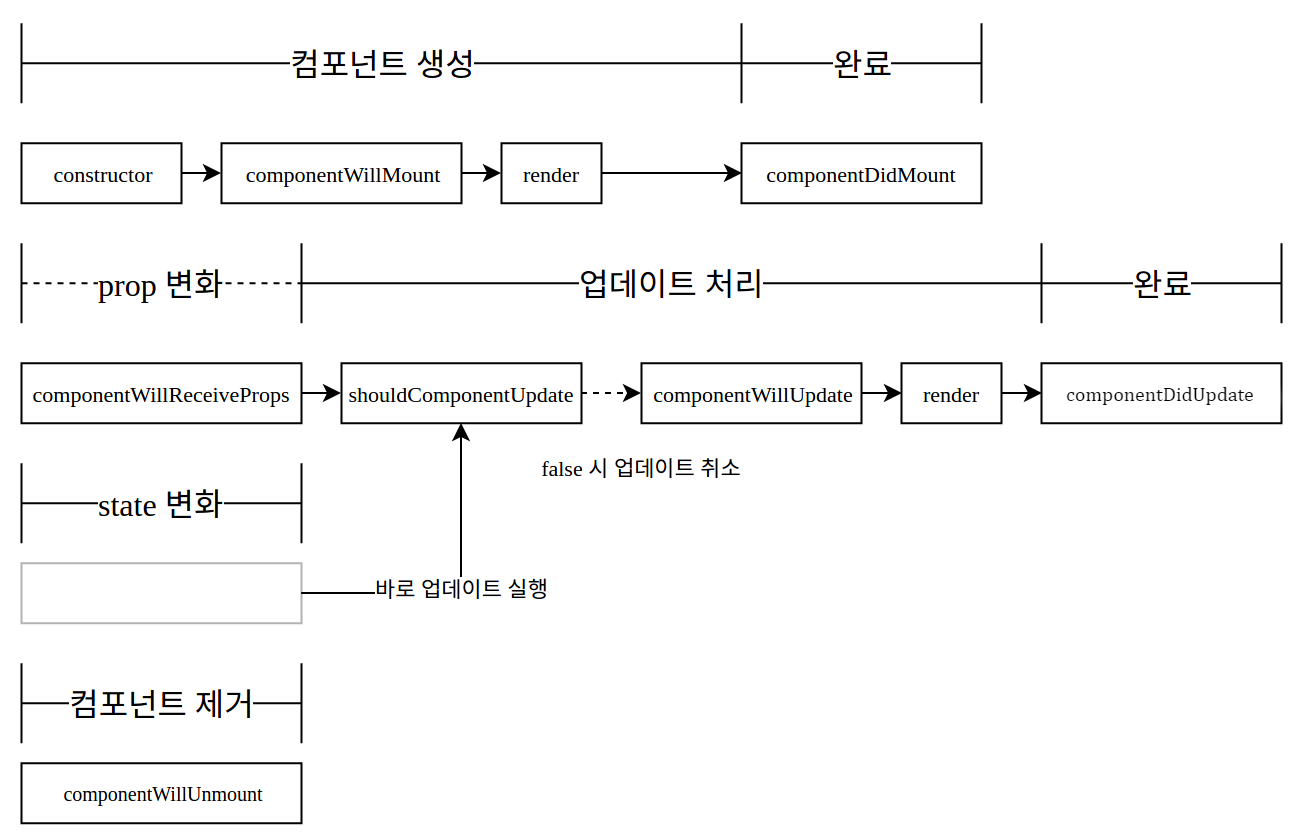
컴포넌트를 생성 할 때는 constructor -> componentWillMount -> render -> componentDidMount 순으로 진행됩니다.
컴포넌트를 제거 할 때는 componentWillUnmount 메소드만 실행됩니다.
컴포넌트의 prop이 변경될 때엔 componentWillReceiveProps -> shouldComponentUpdate -> componentWillUpdate-> render -> componentDidUpdate 순으로 진행됩니다.
이 예제에는 없지만 state가 변경될 떄엔 props 를 받았을 때 와 비슷하지만 shouldComponentUpdate 부터 시작됩니다.
2. 정리
LifeCycle API를 정리하면 다음과 같습니다.

3. 자세히 알아보기
위 메소드들이 어떤 역할을 하는지 이름만 봐도 대충 유추 할 수 있지만.. 자세히 알아봅시다.
constructor
constructor(props){
    super(props);
    console.log("constructor");
}
생성자 메소드로서 컴포넌트가 처음 만들어 질 때 실행됩니다.
이 메소드에서 기본 state 를 정할 수 있습니다.
componentWillMount
componentWillMount(){
    console.log("componentWillMount");
}
컴포넌트가 DOM 위에 만들어지기 전에 실행됩니다.
render
컴포넌트 렌더링을 담당합니다.
componentDidMount
componentDidMount(){
    console.log("componentDidMount");
}
컴포넌트가 만들어지고 첫 렌더링을 다 마친 후 실행되는 메소드입니다.
이 안에서 다른 JavaScript 프레임워크를 연동하거나,
setTimeout, setInterval 및 AJAX 처리 등을 넣습니다.
componentWillReceiveProps
componentWillReceiveProps(nextProps){
    console.log("componentWillReceiveProps: " + JSON.stringify(nextProps));
}
컴포넌트가 prop 을 새로 받았을 때 실행됩니다.
prop 에 따라 state 를 업데이트 해야 할 때 사용하면 유용합니다.
이 안에서this.setState()를 해도 추가적으로 렌더링하지 않습니다.
shouldComponentUpdate
shouldComponentUpdate(nextProps, nextState){
    console.log("shouldComponentUpdate: " + JSON.stringify(nextProps) + " " + JSON.stringify(nextState));
    return true;
}
prop 혹은 state 가 변경 되었을 때, 리렌더링을 할지 말지 정하는 메소드입니다.
위 예제에선 무조건 true 를 반환 하도록 하였지만, 실제로 사용 할 떄는 필요한 비교를 하고 값을 반환하도록 하시길 바랍니다.
예:
return nextProps.id !== this.props.id;
JSON.stringify()를 쓰면 여러 field 를 편하게 비교 할 수 있답니다.
componentWillUpdate
componentWillUpdate(nextProps, nextState){
    console.log("componentWillUpdate: " + JSON.stringify(nextProps) + " " + JSON.stringify(nextState));
}
컴포넌트가 업데이트 되기 전에 실행됩니다.
이 메소드 안에서는
this.setState()를 사용하지 마세요 – 무한루프에 빠져들게 됩니다.
componentDidUpdate
componentDidUpdate(prevProps, prevState){
    console.log("componentDidUpdate: " + JSON.stringify(prevProps) + " " + JSON.stringify(prevState));
}
컴포넌트가 리렌더링을 마친 후 실행됩니다.
componentWillUnmount
componentWillUnmount(){
    console.log("componentWillUnmount");
}
컴포넌트가 DOM 에서 사라진 후 실행되는 메소드입니다.
마치면서..
이번 강좌는 꽤나 간단했군요
위 LifeCycle API 를 숙지해놓으면 앞으로 컴포넌트를 만들 때 도움이 될 거에요.
다음 강좌에선 컴포넌트 및 DOM element 에 reference 를 달아주는 ref 개념에대하여 알아보도록 하겠습니다.

